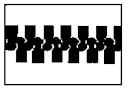
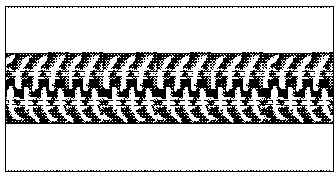
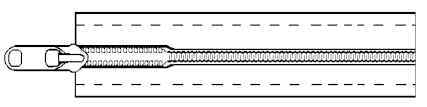
OUTDOOR  FABRICS                                                           outdoor fabrics to make your own gear


serving
you
for
33 years
 

MOST ORDERS SHIP
THE SAME DAY.


Subtotal:

JOIN OUR EMAIL LIST
info@questoutfitters.com

 
Products
  Fabrics
  Fasteners
  Roll Goods
  Tent Poles and Parts
  Misc. Products
  Patterns
  Zippers
 
 SALE
 Swatches
 Wash Code
 Tips and Hints
 Gift Certif.
 Remnants
 Photo Gallery
 Shipping Ad-on
wpe72.jpg (1285 bytes)


HOME PHOTO GALLERY ORDERING/SHIPPING INFO TIPS & HINTS

 
Zipper Tips
 
ZIPPER BASICS
COIL more flexible and smoother running than tooth zippers.  As a general rule, typically the #5 is for clothing and the #7 & #8 are used for gear. Uses: tents, jackets, luggage                                       

TOOTH SIZE the smaller the number the smaller the tooth size: ie. #5 is smaller than #10 and thus not as strong.                                                        

TOOTH SIZE the smaller the number the smaller the tooth size: ie. #5 is smaller than #10 and thus not as strong.

CONTINUOUS ZIPPER a length of zipper, either coil or tooth style, sold by the yard. Allows you to make and customize your own zippers.
 At least one end must be sewn closed. It cannot be used to make separating jacket zippers.

ZIPPER TAB the zipper pull (slider) on the zipper [Note: the zipper tabs from one brand (ie: YKK brand) are usually not interchangeable
with other zipper brands (ie: Maxi brand zippers, etc.)

(1) single tab-a zipper tab with only one pull      


(2) double-reversible tab-a zipper tab with a pull on both sides of the tab. Uses: sleeping bags  


(3) non-locking tab(NL)-a zipper tab which slides easily and has no internal locking mechanism to hold it in place. Uses:
 pockets, luggage, tent doors

(4) locking tab(L)-a coil zipper tab which has an internal locking mechanism to hold the tab in place ie. trouser zipper

(5) key locking tab(KL)-a zipper tabs which locks and unlocks with a removable key. Uses: security envelopes, luggage

WHAT’S THE DIFFERENCE BETWEEN
TOOTH & COIL STYLE ZIPPERS
?


For many projects it’s your preference which style you choose

TOOTH STYLE
has individual blocks of teeth.

COIL STYLE
has continuous wrap of nylon filament

ZIPPER ANATOMY

WHY MAKE YOUR OWN ZIPPERS:
       

There are a number of reasons why you would want to make your own zipper using
continuous coil or continuous tooth zipper length.

1. By doing so you can customize the length and style of the zipper you want ie: one way non-separating, two-way non-separating
or one-end-closed. [NOTE: The

only style of zipper you cannot make with continuous zipper is a one-way or a two-way separating zipper-like a jacket style zipper].
2. When you make your own zipper you can select the style of zipper tab you desire: non-locking, locking, key locking or double
reversible. See the zipper terms box to determine which style of tab to use.  3. Often times it is more economical to make your
own. To determine how much to buy just add 2" to the desired length you want the zipper to be (1" extra for each end) ie: if you
want a 70" zipper you will need at least 72" of continuous zipper.

SHOULD YOU USE TOP & BOTTOM STOPS:

Top and bottom stops can be optional. The purpose of zipper stops is to keep the zipper tab from pulling off when the zipper is |
in use. If an end of the zipper is sewn into a seam you may choose not to attach top/bottom stops because the seam will act
as the "stops". When using zipper stops, bottom stops are attached to one end of a

one end closed zipper and both ends of a one or two-way non-separating zipper. Top stops are used at the top end
(the "open" end) of a one-end closed zipper.

WHAT SIZE TOP & BOTTOM STOPS SHOULD YOU USE:

For #5 and #8 coil and #5 tooth zipper use #7 top and #8 bottom stops. For #10 coil and #10 tooth zipper use #10 top and bottom stops.

  HOW TO ATTACH A ZIPPER TAB


1). On one end of the zipper tape, part the zipper teeth about 2".  

2). Insert one side of the zipper about 1/4 " into the curved end of the zipper slider.


[NOTE: On double pull sliders place the slider so that the angled portion of the
flange is up].


3). Insert the other end of the zipper into the slider. To prevent
misalignment on the other end of the zipper line up the short ends
of the zipper tape evenly.


4). Firmly holding both zipper halves slide the pull onto the zipper teeth. It may take several
attempts to line up the zipper teeth and to prevent a bulge on one side of the zipper tape if the
teeth are misaligned.

[NOTE: When putting two pulls on the same zipper tape, attach the second tab on the
opposite end of the zipper tape using the same method as above].

ZIPPER FAILURE
     Zipper failures are usually the result of the zipper tab (slider) wearing out, especially if no apparent damage is noticeable to the zipper teeth. For zippers where the teeth separate after the zipper is closed, a possible solution (though at times only a temporary one) is to pinch the tab from the top of the tab to the bottom of the tab with a pair of pliers to seat the tab closer to the zipper teeth (not too light though).
If this doesn’t work try replacing the tab before replacing the entire zipper.
ZIPPER WEDGES
                                   
The following method works well to eliminate the bulk when installing zippers in a seam…

Cut the length of zipper needed for the project minus 2" (ie. for a 25" zipper cut a 23" length of zipper. Install zipper slider(s).

Cut 2 zipper wedges out of project fabric, 2" long by width of zipper tape.

On each end of zipper, pin each zipper wedge face side down to right side of zipper matching short raw edges.

Using a zipper foot, stitch 1/2" from raw edge.

Fold zipper wedge out flat & top stitch 1/4" from edge with zipper foot.

Install in project.

HOW TO SHORTEN A ZIPPER

       COIL STYLE ZIPPER:

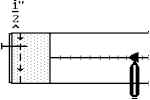
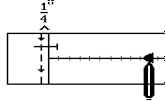
1. Determine the final length you want the zipper to be.   At 
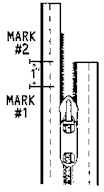
the top end of the zipper place a mark at this measurement (Mark #1).   Place another mark (Mark #2) 1" above Mark #1.

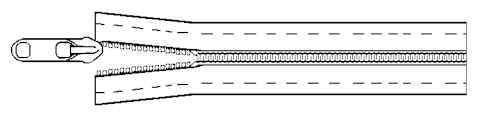
2. With the zipper pull below Mark #1 trim both sides of the zipper at Mark #2.  Using a match or candle sear the raw edges of the zipper tape to prevent raveling.

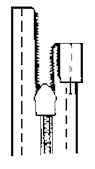
3. Finishing the end:

     METHOD #1: Between Mark #1 and Mark #2, using nail clippers or scissors remove the zipper teeth being careful not to cut into the fabric portion of the zipper tape.  Remove any small plastic parts remaining in this area.

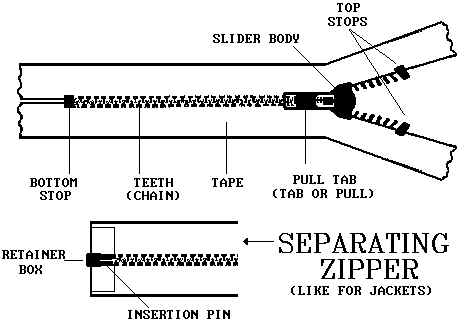
            a.  Remove the two top stops from the zipper pieces that were removed in step 2 (if this is not possible because the zipper stops are plastic or if you are unable to remove them go on to step b.)   Reattach the stops on the zipper placing each over the first few teeth (or if this is not possible as close to the top tooth as possible).  Using a pair of pliers crimp each in place.  The zipper is now ready to be installed.

                 If the zipper stops are plastic or if you are unable to remove them go to the next step (b).

            b.  To keep the zipper pulls from coming off stitch across the top few zipper teeth on both sides of the zipper tape, using a tight zig-zag stitch and stitching in place numerous times.   (NOTE: set the zig-zag stitch width wide enough so that the needle passes freely across the teeth).  The zipper is now ready to be installed.


METHOD #2:  At Mark #1 fold the extra 1" portion of the zipper tape toward the bank and slightly off to the side of the zipper.   Pin.  Stitch to secure the folded edge in place.  The zipper is now ready to be installed.

          TOOTH STYLE ZIPPER:

Method #1: Follow steps 1 through 3a above and if necessary Method 2 below.  [NOTE: in removing the zipper teeth on a tooth zipper pliers may be used to pull the teeth off.  Also, when reattaching the top stops place the stop immediately above the top tooth not over it.]

METHOD #2:  At mark #1 fold the extra 1" portion of the zipper tape toward the back and off to the side of the zipper immediately above the last tooth, making certain there is no space.  Pin in place.  Stitch to secure the folded edge in place. 

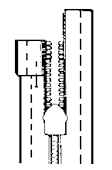
The zipper is now ready to install.

test1